
Create a beautiful Buffalo Check Christmas Banner for the holidays in only a few steps! Tips for cutting felt on the Cricut Explore included.

When it comes to Christmas prints, my favourite are buffalo check and plaid. I always like to have both of them on hand at home. So, when I had the idea to make a quick and easy decorative banner for the holidays, it only took seconds to decide which fabric to use! I hope you like my Buffalo Check Christmas Banner!

*This post contains affiliate links. For more information, please read my disclosure policy*
I happened to have everything I needed for this project on hand already. Don’t you love it when that happens!
Materials for your Buffalo Check Christmas Banner:
Buffalo check fabric (whatever size you wish your banner to be)
Sewing machine
Black thread
2 x 1/2″ wooden dowels (about 13″ each)
White felt
Grey felt
Scissors
Ribbon (I used black velvet)

How to Make your Buffalo Check Christmas Banner
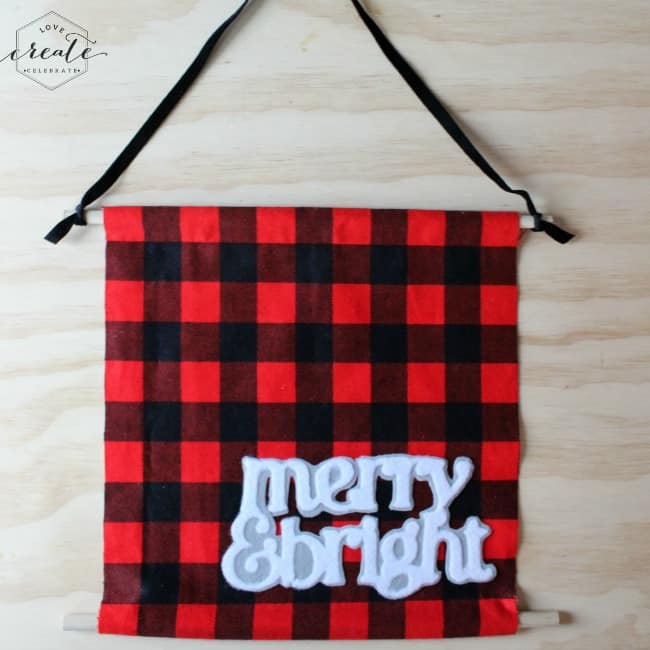
I started by deciding how much fabric to use. Honestly, I didn’t even measure it. I just based it on the number of squares I wanted; 11 squares by 11 squares. On the vertical side, I added two extra squares on each end that could be sewn behind.
[The total was 11 squares horizontally by 15 squares vertically]

Next, I folded the top two squares and the bottom two squares over and pinned them. I used my sewing machine to sew along a straight line on the top and bottom. I sewed the line one square away from the fold, leaving a loop for the wooden dowels to slide through.

Adding the Festive Words
Next, I used an iron to attach my Heat’n Bond Ultra to white and grey sheets of felt. Then, I used my Cricut Explore Air 2 to cut out the words “Merry and Bright” on the white felt. There is a “felt with backing” setting in the custom settings options that you can use for this. I recommend cutting the fabric twice on the cricut simply by hitting the “Go” button again after the first cut is done.

Next, I removed the paper backing off the back of the white cut out felt, and ironed the white felt onto the grey felt. Then, using my scissors, I cut the grey felt, creating a small border of grey around the white

Finally, I removed the paper backing from the grey felt and ironed the tray fabric onto my buffalo check banner, as per the Heat ‘n Bold instructions.

Final Steps
The final step is to a pop one dowel into the top and one into the bottom of the banner, and then to tie your ribbon to each side of the top dowel with a simple knot.
I love the end result! This banner is now proudly hanging in my home as part of my Christmas decor.


If you’re looking for a GREAT gift for the crafter in your life, the Cricut Explore is my number one choice! And you can get FREE shipping all December long with the code FREESHIPDEC at Cricut.com.

If you like Christmas sewing projects, be sure to check out my DIY Burlap Ornaments.


Connie
Sunday 6th of January 2019
Would you share the file for the merry & bright?
Lindivs
Sunday 6th of January 2019
Hi! I actually made this project before the Cricut Design Space was available, so I don't have a saved file to share. So sorry about that!
Geneva
Saturday 9th of December 2017
I love this idea. Thank you for the instructions...
Cricut 101: 35 Things You Can Cut With A Cricut (That Aren’t Vinyl)
Thursday 22nd of December 2016
[…] Buffalo Check Christmas Banner from Love Create Celebrate […]